-
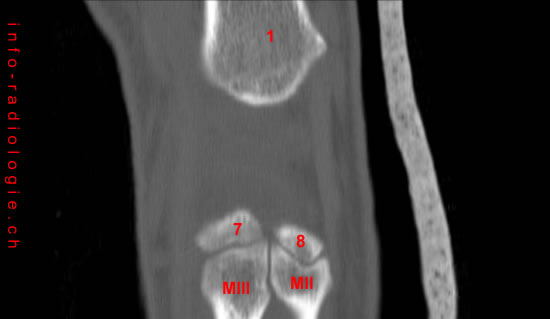
CT of the wrist: anatomy. Coronal view. Image 1. 1, Radius. 7, Capitate. 8, Trapezoid. M1 to MV Base of metacarpal I to V.
-
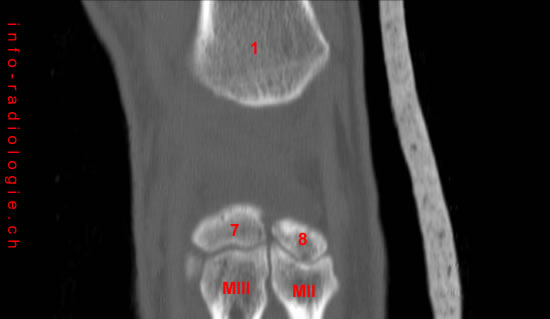
CT of the wrist: anatomy. Coronal view. Image 2. 1, Radius. 7, Capitate. 8, Trapezoid. M1 to MV Base of metacarpal I to V.
-
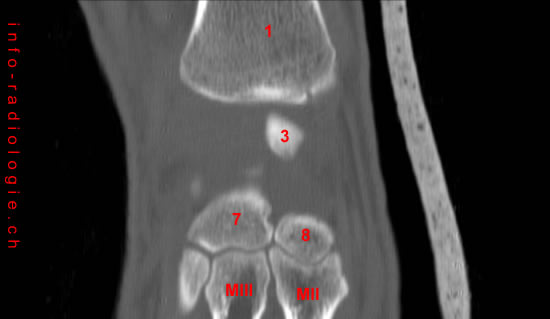
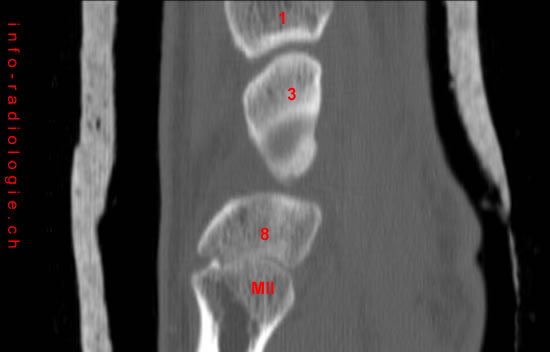
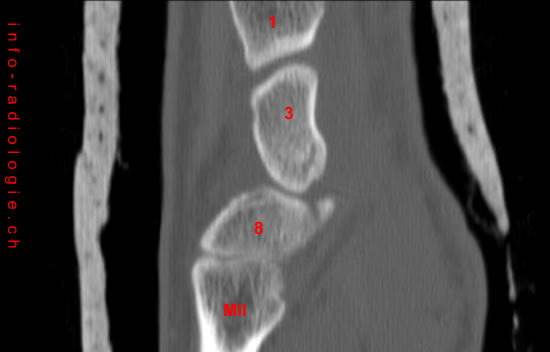
CT of the wrist: anatomy. Coronal view. Image 3. 1, Radius. 7, Capitate. 8, Trapezoid. M1 to MV Base of metacarpal I to V.
-
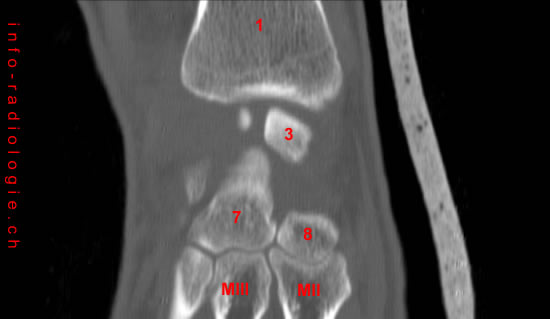
CT of the wrist: anatomy. Coronal view. Image 4. 1, Radius. 2, Ulna. 3, Scaphoid. 7, Capitate. 8, Trapezoid. M1 to MV Base of metacarpal I to V.
-
CT of the wrist: anatomy. Coronal view. Image 5. 1, Radius. 2, Ulna. 3, Scaphoid. 7, Capitate. 8, Trapezoid. M1 to MV Base of metacarpal I to V.
-
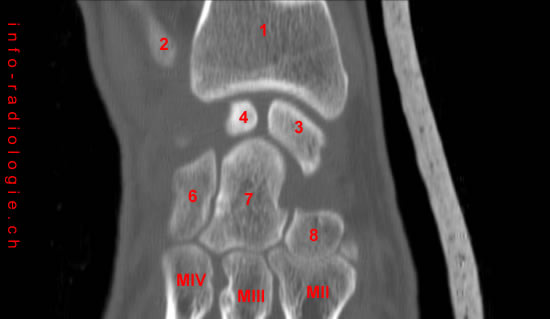
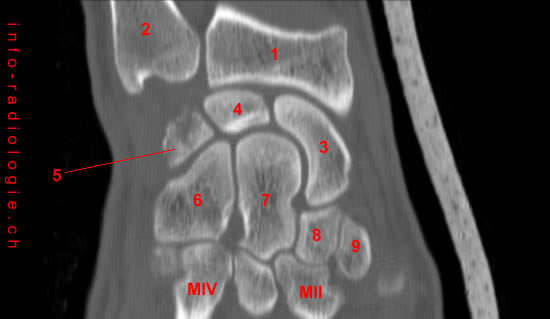
CT of the wrist: anatomy. Coronal view. Image 6. 1, Radius. 3, Scaphoid. 6, Hamate. 7, Capitate. 8, Trapezoid. M1 to MV Base of metacarpal I to V.
-
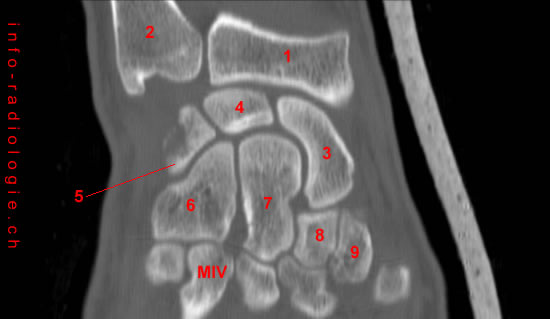
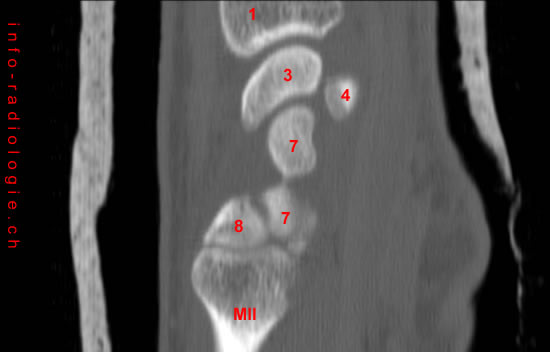
CT of the wrist: anatomy. Coronal view. Image 7. 1, Radius. 2, Ulna. 3, Scaphoid. 4, Lunate. 6, Hamate. 7, Capitate. 8, Trapezoid. M1 to MV Base of metacarpal I to V.
-
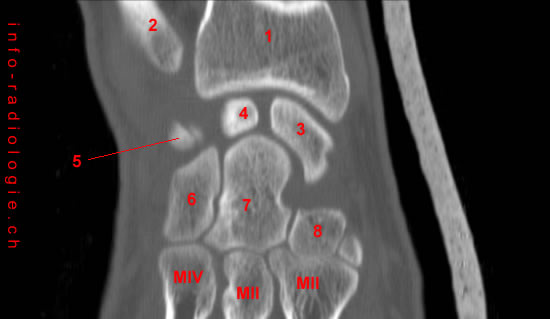
CT of the wrist: anatomy. Coronal view. Image 8. 1, Radius. 2, Ulna. 3, Scaphoid. 4, Lunate. 5, Triquetrum. 6, Hamate. 7, Capitate. 8, Trapezoid. M1 to MV Base of metacarpal I to V.
-
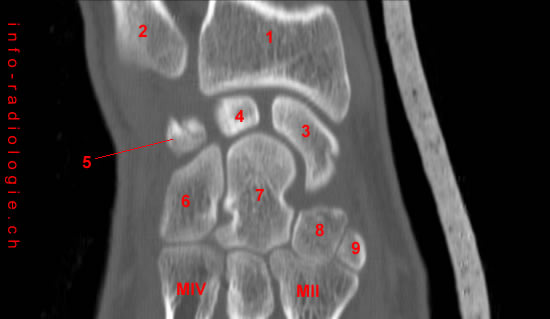
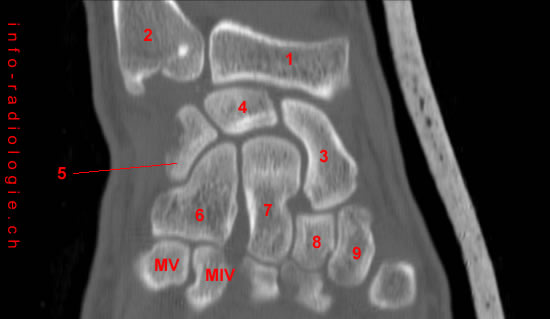
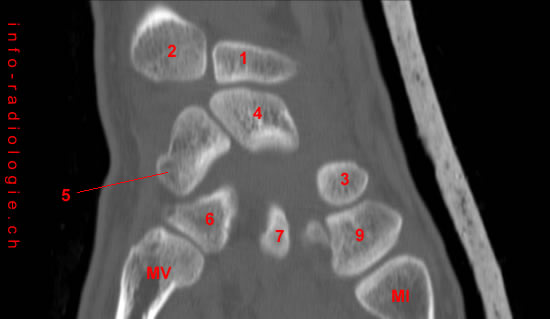
CT of the wrist: anatomy. Coronal view. Image 9. 1, Radius. 2, Ulna. 3, Scaphoid. 4, Lunate. 5, Triquetrum. 6, Hamate. 7, Capitate. 8, Trapezoid. 9, Trapezium. M1 to MV Base of metacarpal I to V.
-
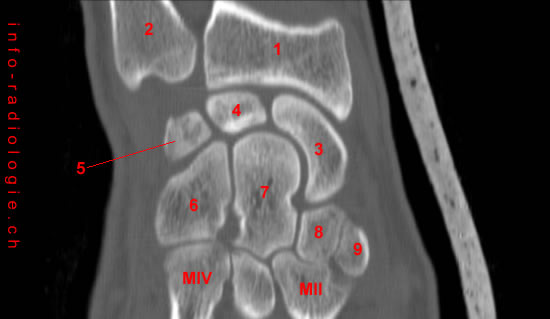
CT of the wrist: anatomy. Coronal view. Image 10. 1, Radius. 2, Ulna. 3, Scaphoid. 4, Lunate. 5, Triquetrum. 6, Hamate. 7, Capitate. 8, Trapezoid. 9, Trapezium. M1 to MV Base of metacarpal I to V.
-
CT of the wrist: anatomy. Coronal view. Image 11. 1, Radius. 2, Ulna. 3, Scaphoid. 4, Lunate. 5, Triquetrum. 6, Hamate. 7, Capitate. 8, Trapezoid. 9, Trapezium. M1 to MV Base of metacarpal I to V.
-
CT of the wrist: anatomy. Coronal view. Image 12. 1, Radius. 2, Ulna. 3, Scaphoid. 4, Lunate. 5, Triquetrum. 6, Hamate. 7, Capitate. 8, Trapezoid. 9, Trapezium. M1 to MV Base of metacarpal I to V.
-
CT of the wrist: anatomy. Coronal view. Image 13. 1, Radius. 2, Ulna. 3, Scaphoid. 4, Lunate. 5, Triquetrum. 6, Hamate. 7, Capitate. 8, Trapezoid. 9, Trapezium. M1 to MV Base of metacarpal I to V.
-
CT of the wrist: anatomy. Coronal view. Image 14. 1, Radius. 2, Ulna. 3, Scaphoid. 4, Lunate. 5, Triquetrum. 6, Hamate. 7, Capitate. 8, Trapezoid. 9, Trapezium. M1 to MV Base of metacarpal I to V.
-
CT of the wrist: anatomy. Coronal view. Image 15. 1, Radius. 2, Ulna. 3, Scaphoid. 4, Lunate. 5, Triquetrum. 6, Hamate. 7, Capitate. 8, Trapezoid. 9, Trapezium. M1 to MV Base of metacarpal I to V.
-
CT of the wrist: anatomy. Coronal view. Image 16. 1, Radius. 2, Ulna. 3, Scaphoid. 4, Lunate. 5, Triquetrum. 6, Hamate. 7, Capitate. 8, Trapezoid. 9, Trapezium. M1 to MV Base of metacarpal I to V.
-
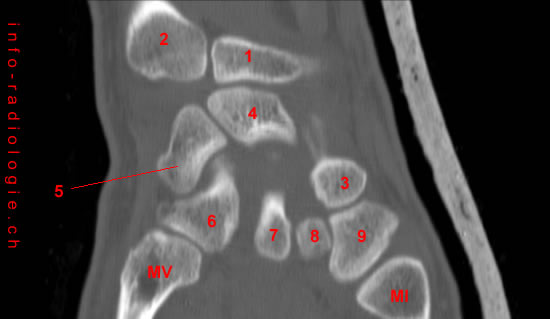
CT of the wrist: anatomy. Coronal view. Image 17. 1, Radius. 2, Ulna. 3, Scaphoid. 4, Lunate. 5, Triquetrum. 6, Hamate. 7, Capitate. 8, Trapezoid. 9, Trapezium. M1 to MV Base of metacarpal I to V.
-
CT of the wrist: anatomy. Coronal view. Image 18. 1, Radius. 2, Ulna. 3, Scaphoid. 4, Lunate. 5, Triquetrum. 6, Hamate. 7, Capitate. 9, Trapezium. M1 to MV Base of metacarpal I to V.
-
CT of the wrist: anatomy. Coronal view. Image 19. 1, Radius. 2, Ulna. 3, Scaphoid. 4, Lunate. 5, Triquetrum. 6, Hamate. 9, Trapezium. M1 to MV Base of metacarpal I to V.
-
CT of the wrist: anatomy. Coronal view. Image 20. 1, Radius. 2, Ulna. 3, Scaphoid. 4, Lunate. 5, Triquetrum. 6, Hamate. 9, Trapezium. M1 to MV Base of metacarpal I to V.
-
CT of the wrist: anatomy. Coronal view. Image 21. 1, Radius. 2, Ulna. 3, Scaphoid. 4, Lunate. 5, Triquetrum. 6, Hamate. 9, Trapezium. M1 to MV Base of metacarpal I to V.
-
CT of the wrist: anatomy. Coronal view. Image 22. 1, Radius. 2, Ulna. 3, Scaphoid. 4, Lunate. 5, Triquetrum. 6, Hamate. 9, Trapezium. M1 to MV Base of metacarpal I to V.
-
CT of the wrist: anatomy. Coronal view. Image 23. 1, Radius. 2, Ulna. 4, Lunate. 5, Triquetrum. 6, Hamate. 9, Trapezium. M1 to MV Base of metacarpal I to V.
-
CT of the wrist: anatomy. Axial view. Image 1. 1, Radius. 2, Ulna.
-
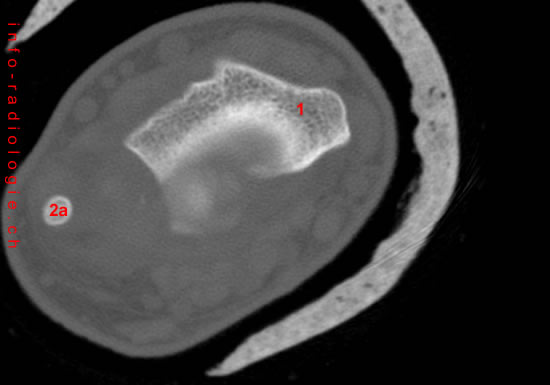
CT of the wrist: anatomy. Axial view. Image 2. 1, Radius. 2a, Styloid process, Ulna.
-
CT of the wrist: anatomy. Axial view. Image 3. 1, Radius. 3, Scaphoid. 4, Lunate.
-
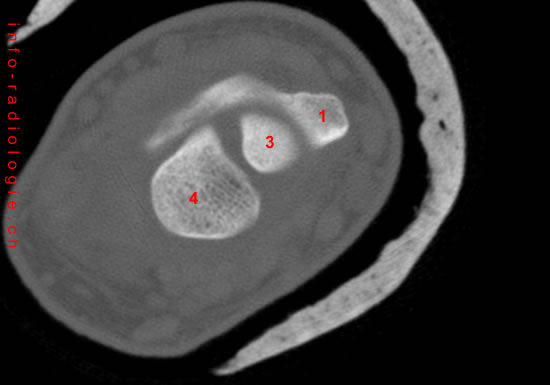
CT of the wrist: anatomy. Axial view. Image 4. 1, Radius. 3, Scaphoid. 4, Lunate. 5, Triquetrum.
-
CT of the wrist: anatomy. Axial view. Image 5. 3, Scaphoid. 4, Lunate. 5, Triquetrum.
-
CT of the wrist: anatomy. Axial view. Image 6. 3, Scaphoid. 5, Triquetrum. 7, Capitate. 10, Pisiform.
-
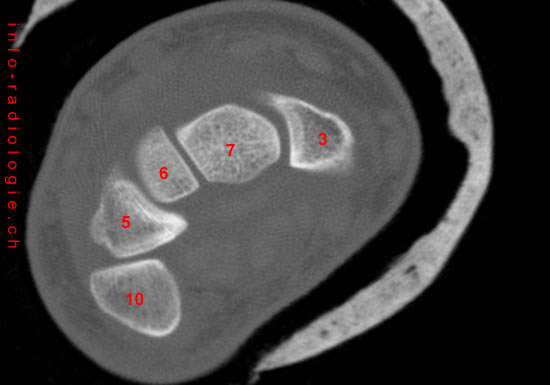
CT of the wrist: anatomy. Axial view. Image 7. 3, Scaphoid. 5, Triquetrum. 6, Hamate. 7, Capitate. 10, Pisiform.
-
CT of the wrist: anatomy. Axial view. Image 8. 3, Scaphoid. 5, Triquetrum. 6, Hamate. 7, Capitate. 10, Pisiform.
-
CT of the wrist: anatomy. Axial view. Image 9. 3, Scaphoid. 5, Triquetrum. 6, Hamate. 7, Capitate. 10, Pisiform.
-
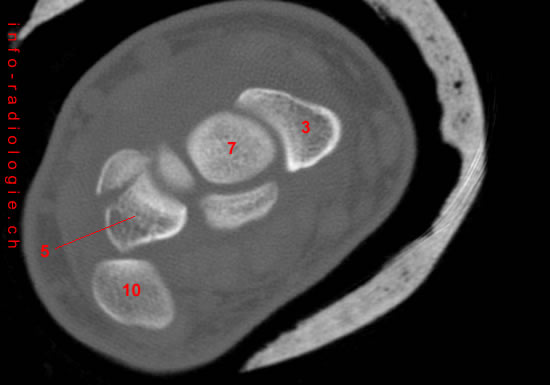
CT of the wrist: anatomy. Axial view. Image 10. 3, Scaphoid. 6, Hamate. 7, Capitate. 9, Trapezium.
-
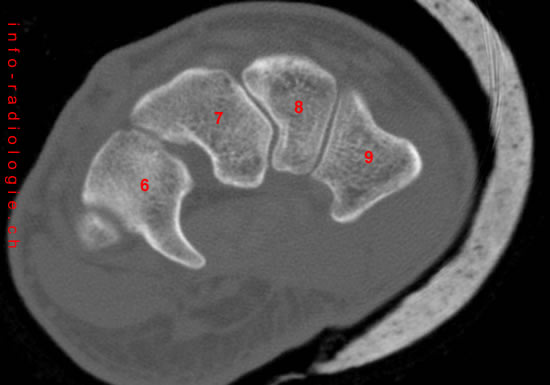
CT of the wrist: anatomy. Axial view. Image 11. 6, Hamate. 7, Capitate. 8, Trapezoid. 9, Trapezium.
-
CT of the wrist: anatomy. Axial view. Image 12. 6, Hamate. 7, Capitate. 8, Trapezoid. 9, Trapezium.
-
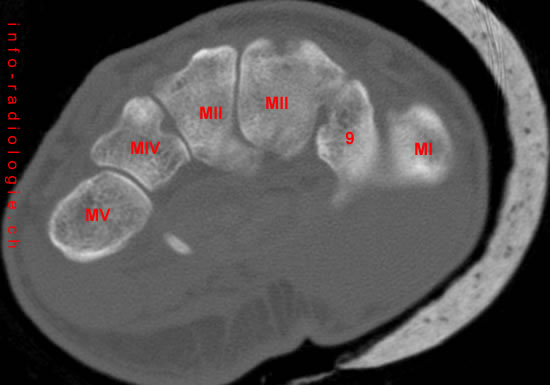
CT of the wrist: anatomy. Axial view. Image 13. 6a, Hook, Hamate. 7, Capitate. 8, Trapezoid. 9, Trapezium. M1 to MV Base of metacarpal I to V.
-
CT of the wrist: anatomy. Axial view. Image 14. 9, Trapezium. M1 to MV Base of metacarpal I to V.
-
CT of the wrist: anatomy. Axial view. Image 15. 9, Trapezium. M1 to MV Base of metacarpal I to V.
-
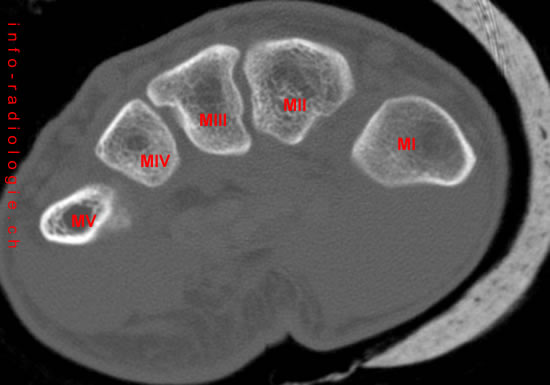
CT of the wrist: anatomy. Axial view. Image 16. M1 to MV Base of metacarpal I to V.
-
CT of the wrist: anatomy. Sagittal view. Image 1. 2, Ulna. M1 to MV Base of metacarpal I to V.
-
CT of the wrist: anatomy. Sagittal view. Image 2. 2, Ulna. 6, Hamate. M1 to MV Base of metacarpal I to V.
-
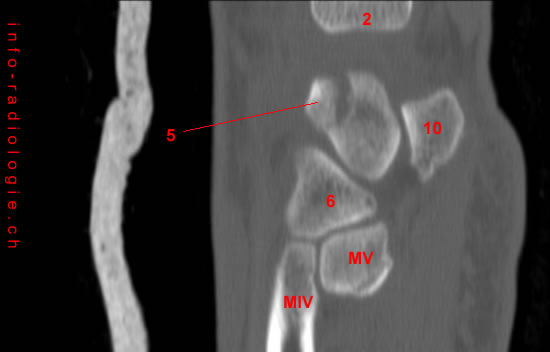
CT of the wrist: anatomy. Sagittal view. Image 3. 2, Ulna. 5, Triquetrum. 6, Hamate. 10, Pisiform. M1 to MV Base of metacarpal I to V.
-
CT of the wrist: anatomy. Sagittal view. Image 4. 1, Radius. 2, Ulna. 5, Triquetrum. 6, Hamate. 10, Pisiform. M1 to MV Base of metacarpal I to V.
-
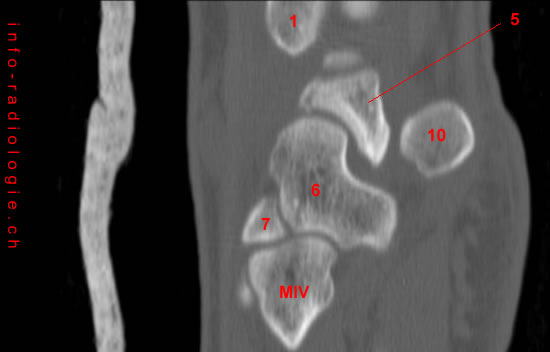
CT of the wrist: anatomy. Sagittal view. Image 5. 1, Radius. 5, Triquetrum. 6, Hamate. 7, Capitate. 10, Pisiform. M1 to MV Base of metacarpal I to V.
-
CT of the wrist: anatomy. Sagittal view. Image 6. 1, Radius. 4, Lunatum. 5, Triquetrum. 6, Hamate. 7, Capitate. M1 to MV Base of metacarpal I to V.
-
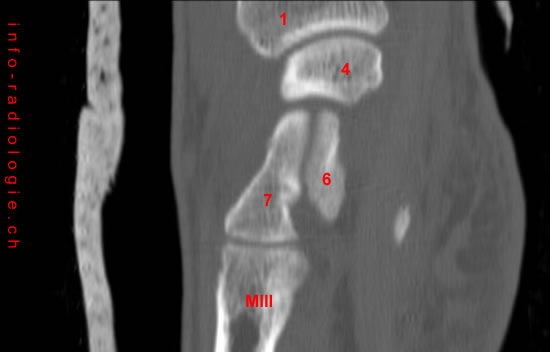
CT of the wrist: anatomy. Sagittal view. Image 7. 1, Radius. 4, Lunatum. 6, Hamate. 7, Capitate. M1 to MV Base of metacarpal I to V.
-
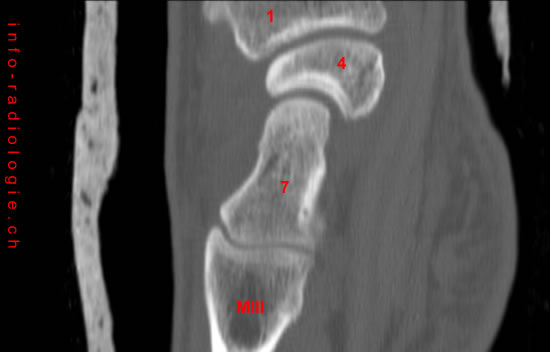
CT of the wrist: anatomy. Sagittal view. Image 8. 1, Radius. 4, Lunatum. 7, Capitate. M1 to MV Base of metacarpal I to V.
-
CT of the wrist: anatomy. Sagittal view. Image 9. 1, Radius. 4, Lunatum. 7, Capitate. M1 to MV Base of metacarpal I to V.
-
CT of the wrist: anatomy. Sagittal view. Image 10. 1, Radius. 3, Scaphoid. 4, Lunatum. 7, Capitate. M1 to MV Base of metacarpal I to V.
-
CT of the wrist: anatomy. Sagittal view. Image 11. 1, Radius. 3, Scaphoid. 4, Lunatum. 7, Capitate. 8, Trapezoid. M1 to MV Base of metacarpal I to V.
-
CT of the wrist: anatomy. Sagittal view. Image 12. 1, Radius. 3, Scaphoid. 8, Trapezoid. M1 to MV Base of metacarpal I to V.
-
CT of the wrist: anatomy. Sagittal view. Image 13. 1, Radius. 3, Scaphoid. 8, Trapezoid. M1 to MV Base of metacarpal I to V.
-
CT of the wrist: anatomy. Sagittal view. Image 14. 1, Radius. 3, Scaphoid. 8, Trapezoid. 9, Trapezium. M1 to MV Base of metacarpal I to V.
-
CT of the wrist: anatomy. Sagittal view. Image 15. 1, Radius. 3, Scaphoid. 9, Trapezium. M1 to MV Base of metacarpal I to V.
-
CT of the wrist: anatomy. Sagittal view. Image 16. 9, Trapezium. M1 to MV Base of metacarpal I to V.
